Blog - Martin Pierce

Lost wax casting

3D Printing as useful tool in casting custom door handles

 Casting a custom door handle requires an understanding of the shrinkage that occurs in traditional lost wax casting. When casting in bronze or steel the process starts with a pattern often sculpted by hand in wood or clay but with the advent of 3D printing we are now in some cases able to produce this as a Quick Cast  stereolithographic print (SLA). While these 3D prints are useful in developing prototypes they still need to be finished by hand and are often too expensive to be used as wax substitutes since they too are burnt out and wasted in the lost wax process.

3D prints have their place as prototypes and for custom short run projects where the cost of developing a mold or tooling cannot be amortized over a large enough quantity to make the project cost effective.

Recently we considered 3D printing as a protype tool in helping to create a left and right pattern for a short run project of 4 sets of door handles. When developing a new handle set we often break the design down into component parts and where there is a directional detail this means we must make 2 patterns one for left and one for the right facing section. 3D scanning and modeling allows us to use one carved pattern to create a second mirror image model that is printed in a resin compound. While this reduces the development cost, the digital print often needs to be re-carved so that very fine details like leaf veins and scales can be sharpened by hand.

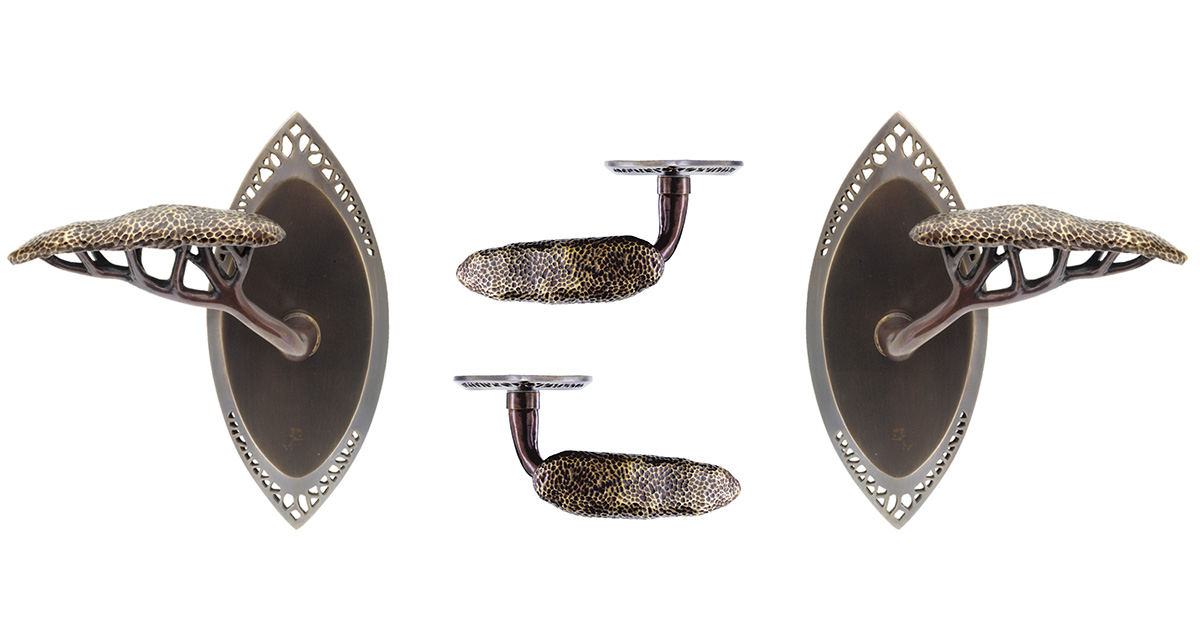
The picture below of the Hedgerow door lever shows that the branches of this piece are very directional thus requiring a left and right mold, but the canopy is generic to both levers.

Hedgerow lever left right.jpg


One advantage that SLA’s have over wax patterns is that they are not subject to shrinkage. In lost wax casting shrinkage occurs when the molten wax solidifies and when the bronze or steel casting is poured. There are a wide variety of waxes used in this process and their composition effects how they pour, how they solidify and how much they shrink. While a wax pattern may shrink by approximately .6% no shrinkage occurs with the print.


Trying to mathematically predict the exact amount by which the wax pattern and subsequent casting will shrink is difficult when developing a new piece. If the dimension of the piece is critical then we will often create a mold and wax of a smaller section so that we can exactly determine the overall shrinkage and can then re-scale the complete piece making it and the subsequent mold large enough to compensate for this shrinkage.

One Feather At A Time - The Raven Sculpture Journal

Continuing the journal of Martin Pierce’s Raven sculpture. 

Following his visit to Big Bear where he was able to see  raven’s up close Martin decided he needed to change the pose of his sculpture to show the raven cawing with his beak open and throat puffed to make the distinctive sound raven’s use when declaring their territory or courting.

Once captured in pencil, the raven’s 3  perspectives  were outlined onto rough wood blocks, one for each section of his body. In deciding  how to sectionalize the raven’s shape Martin had to reverse engineer the sculpture by determining how the bronze would eventually flow, where the  gates for the bronze could best be added and where thereby the bird could best be sectioned.

Constructing and de-constructing a Raven for lost wax casting

Constructing and de-constructing a Raven for lost wax casting

If Martin had been intending to make only one wood sculpture he would have chosen a wood with more character than basswood and would have sculpted the bird from one block of wood rather than several pieces. However, as this sculpture will be used to create several molds for lost wax casting the sculpture was made so that it could be de-constructed.

The raven will be cast in bronze and will be available as a limited edition. The raven will join his feathered friend the scrub jay in Martin’s collection of bronze sculptures, which as well as portraying birds also portrays insects in fictional settings.

Creating Custom Door Hardware Using The Lost Wax Method of Casting

Limited Edition Custom Handle Commission in Bronze

Limited Edition Custom Handle Commission in Bronze

We are frequently asked to make one of a kind door handles for designers looking for a statement piece for a restaurant or retail project or corporations looking to expand their brand presence. The requests we receive can be challenging and some, such as a request for rotating human hand, border on the bizarre.

As a company we do a lot of custom casting but  the process we use to create our work is costly and does not lend itself to value engineering. The focus of this article is to outline the process with the aid of photographs taken during the  creation of a wine cellar door handle, commissioned by a client as a limited edition.

As designers we truly respect the creative process and understand the time that goes into creating a unique piece and accordingly will only work on projects that are free from plagiarism.

The Process – step by step

1.        Concept drawing(s) often several form the starting point to a dialogue where we establish the size of the handle, whether it needs to operate a latch or is to be used as a stationary grip.

2.        Perspective drawings are detailed drawings that show the client how the piece will look when viewed from different vantage points. We need to understand if the piece is being viewed from all sides as it would be if used as a grip mounted on a glass door. How the piece is to be mounted either by through bolts or surface screws will need to be decided and drawn.

Pattern Development

A three dimensional pattern is created in wood or if the piece is small, typically less than 3”, then in solid wax. At this point 3D printing is slow and  expensive but it can be useful if one is creating a mirror image of a simple shape especially when the shape is symmetrical. We used 3D printing when creating the simple gourd shape for our Dragon Egg Sconce.

For larger detailed and organic pieces Martin Pierce carves the pattern by hand. He uses a reductive approach to whittle down his over-sized block of wood to create the pattern. Other pattern makers use an additive approach and they create the pattern by adding and forming pieces of clay. In our case study the design required 4 patterns to be carved, a left and right facing waiter and their two goblets. The patterns took many hours to create but by carving the pieces with an array of different chisels Martin could create a very detailed fine pattern and one whose details could be captured in bronze.

pattern-later-stage

Mold Making

Each pattern requires a mold and if the piece has a lot of undercuts it may require a 2 piece mold. In this instance we developed a total of 4  two -piece molds each one made to encapsulate one of the 4 patterns. The molds are made from building up successive layers of silicone rubber that pick up the fine detail of the pattern. The pliable nature of the rubber is then reinforced by an outer casing made of plaster or metal which holds the 2 parts of the mold in place so that they can withstand the pressure applied when molten wax is injected into the cavity. The cavity is created when the pattern is removed from the mold and to make this easier the pattern is coated with a release agent before the rubber is applied.

Casting – what is meant by lost wax?

For every piece we cast in bronze, we first make a wax replica by pouring molten wax into the cavity of the mold. Theoretically these replicas could be 3 D printed but at this point the process is slow and expensive. Depending on the size and cooling time it is possible to make multiple waxes in a short period of time. At this point the channels that will be needed to supply the molten metal and those that are needed to vent the air created by flowing metal are added in the form of sprues and gates.

blue-wax-men.jpg

The wax replicas are then “shelled” and dipped into successive coats of liquid silica to build up a thick outer shell. If the shell wall is not sufficiently thick then it may well fail when the bronze is eventually poured. For large castings the shelling process can take weeks but it is a critical step that determines the success of the casing.

After the wax has been shelled the wax will be removed in an autoclave steamer that essentially steams or heats up the solid shell so that the wax is evacuated or “lost”.

 The hollow shell or ceramic case is then fired and is ready to receive the molten bronze. Once the casting has cooled all the sprues and gates will be ground off and the casting will be groomed with metal files to remove any casting imperfections.

Chasing and machining the casting

Chasing and machining the casting

The casting will then be machined for mounting bolts, latches or other locks  that it will be used with.    

The casting is then ready to be finished. In our case study we applied 3 different types of chemical patina and re-burnished key areas so we could delineate the writing on the goblet and the waistcoat buttons on the waiter’s jackets.