Blog - Martin Pierce

Custom door hardware

When Creative Minds Collaborate

The result can be a wonderful surprise as I just discovered when I came across the entry way door to an Encinitas residence designed by the very talented Joseph McCarter, the Principal Designer at J.W. McCarter & Associates. I happened upon a close-up shot of our green patina lizard set which was posted on Instagram and reached out to JWM to find out more.

What I discovered was an entry way grand in scale that seamlessly married the skills of wood artisans, glass makers and bronze sculptors to create a unique entry experience. The close up shot of the Lizard handle set only hints at the puzzle like design of the door and frame that was Joseph McCarters’ creative solution to a shortage of long boards of Mahogany.

See More from Our Lizard CollectionPhotographer Nader Essa, Photos Courtesy J.W.McCarter & Associates

See More from Our Lizard Collection

Photographer Nader Essa, Photos Courtesy J.W.McCarter & Associates

The puzzle design accentuates the scale of the entry and it is a playful theme that is carried through with our whimsical gecko pull mounted as an incidental accent on the right side of the door. Nature is clearly the driving force for this entry statement and the tropical monstera adansonil “cheese plant” fabricated in stained glass by Glass Light Studio is the vine that weaves from the top to the bottom of the door tying together the parrot, gecko and lizard.

The entry door acts as a bridge from exterior to interior. The grandeur of exterior is achieved in part through the scale of the mahogany puzzle sections and by the upward shining light manufactured by ELA. The treatment of the door interior is more familiar with the door being integrated with the surface of the interior walls and mounted art.

Nader Essa Photography (3)  (1).jpg


The photographs shown here are courtesy of J.W. McCarter & Associates and the photographer was Nader Essa who specializes in architectural and interior design photography

The door was fabricated by Busch Woodworking.

Quebec an inspiring Canadian Province

We are taking our annual respite from hot congested Los Angeles and the demands of making door hardware to visit lush Quebec, a province with easy to access unspoiled parks.
Parc national de la Jacques-Cartier is named its impressive and varied river whose turbulent rapids and gentler currents host a variety of fish and bird life. The park is a mere 45 minute drive from old Quebec city and has many well maintained trails suited to all levels of hiker. Feeling adventurous, we took the Les Loupes trail marked for the advanced hiker but manageable for the less advanced if frequent stops to regain ones breath are factored in. The trail goes up Sautauriski Mountain and provides a great Southern view outlook over the Jacques-Cartier river valley. Despite it’s name “ Les Loupes” this is not a loop trail (the word is French for wolf) but is a 10 km trail 5km there and 5 back. In the interests of factual reporting I must admit we only completed half of the trail and turned back to explore the river valley.

Martin Pierce on the Les Loupes (the wolf) trail.Use this link for details on this park and its 200 plus trails visit

Martin Pierce on the Les Loupes (the wolf) trail.

Use this link for details on this park and its 200 plus trails visit

Creating Custom Door Hardware Using The Lost Wax Method of Casting

Limited Edition Custom Handle Commission in Bronze

Limited Edition Custom Handle Commission in Bronze

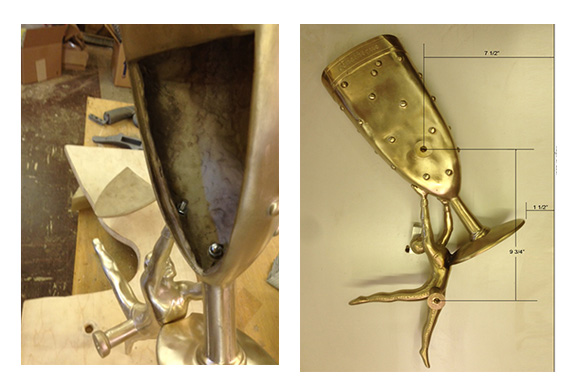
We are frequently asked to make one of a kind door handles for designers looking for a statement piece for a restaurant or retail project or corporations looking to expand their brand presence. The requests we receive can be challenging and some, such as a request for rotating human hand, border on the bizarre.

As a company we do a lot of custom casting but  the process we use to create our work is costly and does not lend itself to value engineering. The focus of this article is to outline the process with the aid of photographs taken during the  creation of a wine cellar door handle, commissioned by a client as a limited edition.

As designers we truly respect the creative process and understand the time that goes into creating a unique piece and accordingly will only work on projects that are free from plagiarism.

The Process – step by step

1.        Concept drawing(s) often several form the starting point to a dialogue where we establish the size of the handle, whether it needs to operate a latch or is to be used as a stationary grip.

2.        Perspective drawings are detailed drawings that show the client how the piece will look when viewed from different vantage points. We need to understand if the piece is being viewed from all sides as it would be if used as a grip mounted on a glass door. How the piece is to be mounted either by through bolts or surface screws will need to be decided and drawn.

Pattern Development

A three dimensional pattern is created in wood or if the piece is small, typically less than 3”, then in solid wax. At this point 3D printing is slow and  expensive but it can be useful if one is creating a mirror image of a simple shape especially when the shape is symmetrical. We used 3D printing when creating the simple gourd shape for our Dragon Egg Sconce.

For larger detailed and organic pieces Martin Pierce carves the pattern by hand. He uses a reductive approach to whittle down his over-sized block of wood to create the pattern. Other pattern makers use an additive approach and they create the pattern by adding and forming pieces of clay. In our case study the design required 4 patterns to be carved, a left and right facing waiter and their two goblets. The patterns took many hours to create but by carving the pieces with an array of different chisels Martin could create a very detailed fine pattern and one whose details could be captured in bronze.

pattern-later-stage

Mold Making

Each pattern requires a mold and if the piece has a lot of undercuts it may require a 2 piece mold. In this instance we developed a total of 4  two -piece molds each one made to encapsulate one of the 4 patterns. The molds are made from building up successive layers of silicone rubber that pick up the fine detail of the pattern. The pliable nature of the rubber is then reinforced by an outer casing made of plaster or metal which holds the 2 parts of the mold in place so that they can withstand the pressure applied when molten wax is injected into the cavity. The cavity is created when the pattern is removed from the mold and to make this easier the pattern is coated with a release agent before the rubber is applied.

Casting – what is meant by lost wax?

For every piece we cast in bronze, we first make a wax replica by pouring molten wax into the cavity of the mold. Theoretically these replicas could be 3 D printed but at this point the process is slow and expensive. Depending on the size and cooling time it is possible to make multiple waxes in a short period of time. At this point the channels that will be needed to supply the molten metal and those that are needed to vent the air created by flowing metal are added in the form of sprues and gates.

blue-wax-men.jpg

The wax replicas are then “shelled” and dipped into successive coats of liquid silica to build up a thick outer shell. If the shell wall is not sufficiently thick then it may well fail when the bronze is eventually poured. For large castings the shelling process can take weeks but it is a critical step that determines the success of the casing.

After the wax has been shelled the wax will be removed in an autoclave steamer that essentially steams or heats up the solid shell so that the wax is evacuated or “lost”.

 The hollow shell or ceramic case is then fired and is ready to receive the molten bronze. Once the casting has cooled all the sprues and gates will be ground off and the casting will be groomed with metal files to remove any casting imperfections.

Chasing and machining the casting

Chasing and machining the casting

The casting will then be machined for mounting bolts, latches or other locks  that it will be used with.    

The casting is then ready to be finished. In our case study we applied 3 different types of chemical patina and re-burnished key areas so we could delineate the writing on the goblet and the waistcoat buttons on the waiter’s jackets.