Blog - Martin Pierce

3D printing

Why research and development for custom hardware is expensive


The old and new schools for creating patterns and molds - part 2


Your design skill set and your preference for digital versus free hand designing may influence your choice when it comes to deciding how to create the pattern or file for casting.
Whichever road you take the research and development (R&D) costs will be significant. The R&D costs are often misunderstood, and many consumers have a hard time accepting that the pattern development can run into the thousands depending on the size and intricacy of the design. This cost is on top of the cost incurred in the design process (part 1), so perhaps we are stating the obvious when we state that custom, one of a kind door hardware, is inherently expensive.

Choice of medium for pattern making.

Regardless of whether the design is digital or old school and made with pencil and paper you should be able to use the same mediums when creating your pattern for use in investment casting or sand castings. If you have the budget and are developing a piece for high volume production, then die casting or 3D printing may be good options and may not require a pattern to be made. While die casting and 3D printing do not require a physical pattern, they depend on the design to be made with CAD/CAM software or comparable software that can capture the exact measurements and topography details of your design so that a virtual pattern can be created.


Mediums for Physical Patterns

The pattern for investment casting can be made from any medium that is both strong and non-permeable or that can be made strong by firing in a kiln. Your choice of medium will depend on your manual skills, can you carve or create a design in modelling clay? The choice will also depend on how dense the detail and undercuts are in your design, does the design have a lot of detail or is the design for a smooth piece with the detail confined to the edges? Our patterns are always made in a reductive way by carving or machining rather than by the additive clay modelling method.

Left cast trumpet flower   Right hard blue wax pattern with gate in red wax

Left cast trumpet flower Right hard blue wax pattern with gate in red wax


Mediums for carving or machining

Rigged foam –
High density rigid polyurethane foam comes in a variety of sheet sizes, thickness, and density. We typically use a medium 15lb per ft density. It can be machined on a bandsaw, turned on a lathe or used with cutting routers. It is ideal for moderately detailed patterns but it’s lack of tensile strength and brittle nature make it less useful for very detailed or large patterns.

Basswood & other woods
Basswood is stronger than rigged foam and finer details such as leaf ends or fingers tips that would be to fragile and brittle if rendered in foam are easy to create in this close-grained soft wood. Patterns created in basswood and foam need to be sealed with a paint primer or other non-permeable layer that act as a barrier to protect the pattern from liquid damage that may occur during mold making.

Blue jewelers’ wax
There are many types of wax available in block and sheet form that can be machined or carved to create a pattern, but we typically use a blue hard wax and pattern making.


Making A Custom Cabinet Pull from Wax to Bronze

Following on from last week’s post I will be showing how we tackle the task of changing the direction of an orchid cabinet pull from left to right. Down-stream we will be making a new mold that will allow us to create a right facing orchid stem directly from the mold with each wax section emerging from the mold as a component for a right facing pull. Until demand warrants the time and cost of making a permanent mold we will need to re-work the stem and flower sections at the wax stage to create a new right pull. This process will be repeated for each pull ordered and as we have 8 pulls to make with each pull requiring 3 wax sections, we will be investing a considerable amount of time modelling by hand all 24 wax sections. The waxes will then be shelled with silica and eventually will be melted out in an autoclave and fired to create a hollow shell which will be invested with molten bronze. The wax that is burnt out is the reason this casting method is often referred to as “lost wax” casting. Rather than making wax replicas one could map the original left pattern to create a file for a right pull and then print each section or possibly the complete piece as a 3D print. To create the print, successive layers of photo-reactive resin are built up and allowed to solidify, a process that would also take hours. Given the extremely detailed nature of the pull the 3D print would still require some cleaning up before it could be shelled, making it a less viable method of production.

Left to Right: Flower 2 parts, Assembled in wax, Front View, Profile View

In Photoshop it is easy using the edit function to flip an image horizontally so that it is shown as the mirror opposite and so change a left directional piece to a right in directional one. However, in the real 3D world this would not work and in the case of the orchid stem rotating the pull right would result in the 2 flower heads facing down making for an upside- down pull. To achieve a right facing pull the curve of the sprig as well as the flower heads and buds need to be cut and re-positioned.

Orchid Components - left facing buds and flowers re-positioned and shaped to become right facing

Orchid Components - left facing buds and flowers re-positioned and shaped to become right facing

What is the best medium for door hardware patterns

There is no correct answer to this question, but your choice will depend on your method of designing and your skill sets. The broad choice is between creating a pattern using traditional carving or modeling techniques versus 3D designing and printing.

Traditional techniques -

You can create a solid pattern by modelling the design in clay and by adding and removing clay to obtain the desired shape. We are sculptors by training and create our patterns using wood or jewelers wax or high-density rigid foam. Basswood carves well as it is a close grained soft wood but the grain is distracting, and its directional nature means you have to be an adept carver changing direction with your chisels as you follow the grain. When the wood pattern has been carved, we typically coat it with a matt grey primer which both fills the grain and helps us see any imperfections that need to be carved out and sanded. While Jewelers blue wax is dense and one can achieve good detail it is not as strong as basswood and is more brittle which makes it less ideal when creating fine deep lines. Moreover, even though free of grain it has a uniform color that has a pronounced sheen both of which make it difficult to see what has been carved.

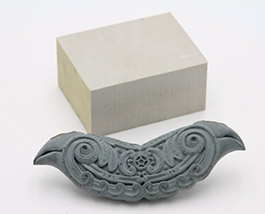
As both wax and wood have drawbacks, we find ourselves increasingly turning to high density rigid foam a product often used in the film industry by set designers to create props. This medium is light weight, dense, grain-less and matt and carves beautifully. It is available in blocks and easy to cut and glue and moderately priced.


The Hawaiian bird pulls were ordered recently by designer Christina Hilt in Florida in warmer tones to compliment the golden burl wood in her client’s closet. A dark patina accentuates the detail in a piece but if the pattern is carved with a deep relief carving then these details will still be seen even where there is minimal patina and minimal tonal contrast as was the case with Christina’s order.

Pattern in high density foam with foam block

Pattern in high density foam with foam block

Contemporary 3D pattern making

 If you are adept in digital designing, then you would begin by designing your pattern in illustrator or Painter or other 3D program. On completion the design would need to be output as a STL file which could then be printed as an SLA print which is a photo polymer