Yorkshire Terrier – patina artistry

One of the most challenging tasks when making bronze dog door handles is finding a way to capture the appearance of a breed where the hair color is key to the breed’s identity. This is particularly true for Yorkshire Terriers whose colors include the black, blue, tan and gold of the Black and Tan Terriers and Clydesdale Terriers from which they were bred. The color of the Yorkie also changes, with younger dogs showing more black and tan, that in older dogs fades to paler blues and gold.

While it may be possible to capture some of this color range with clever mixing of pigmented patinas the effect would be to create a “painted” contrived dog head which would detract from the beauty of bronze.

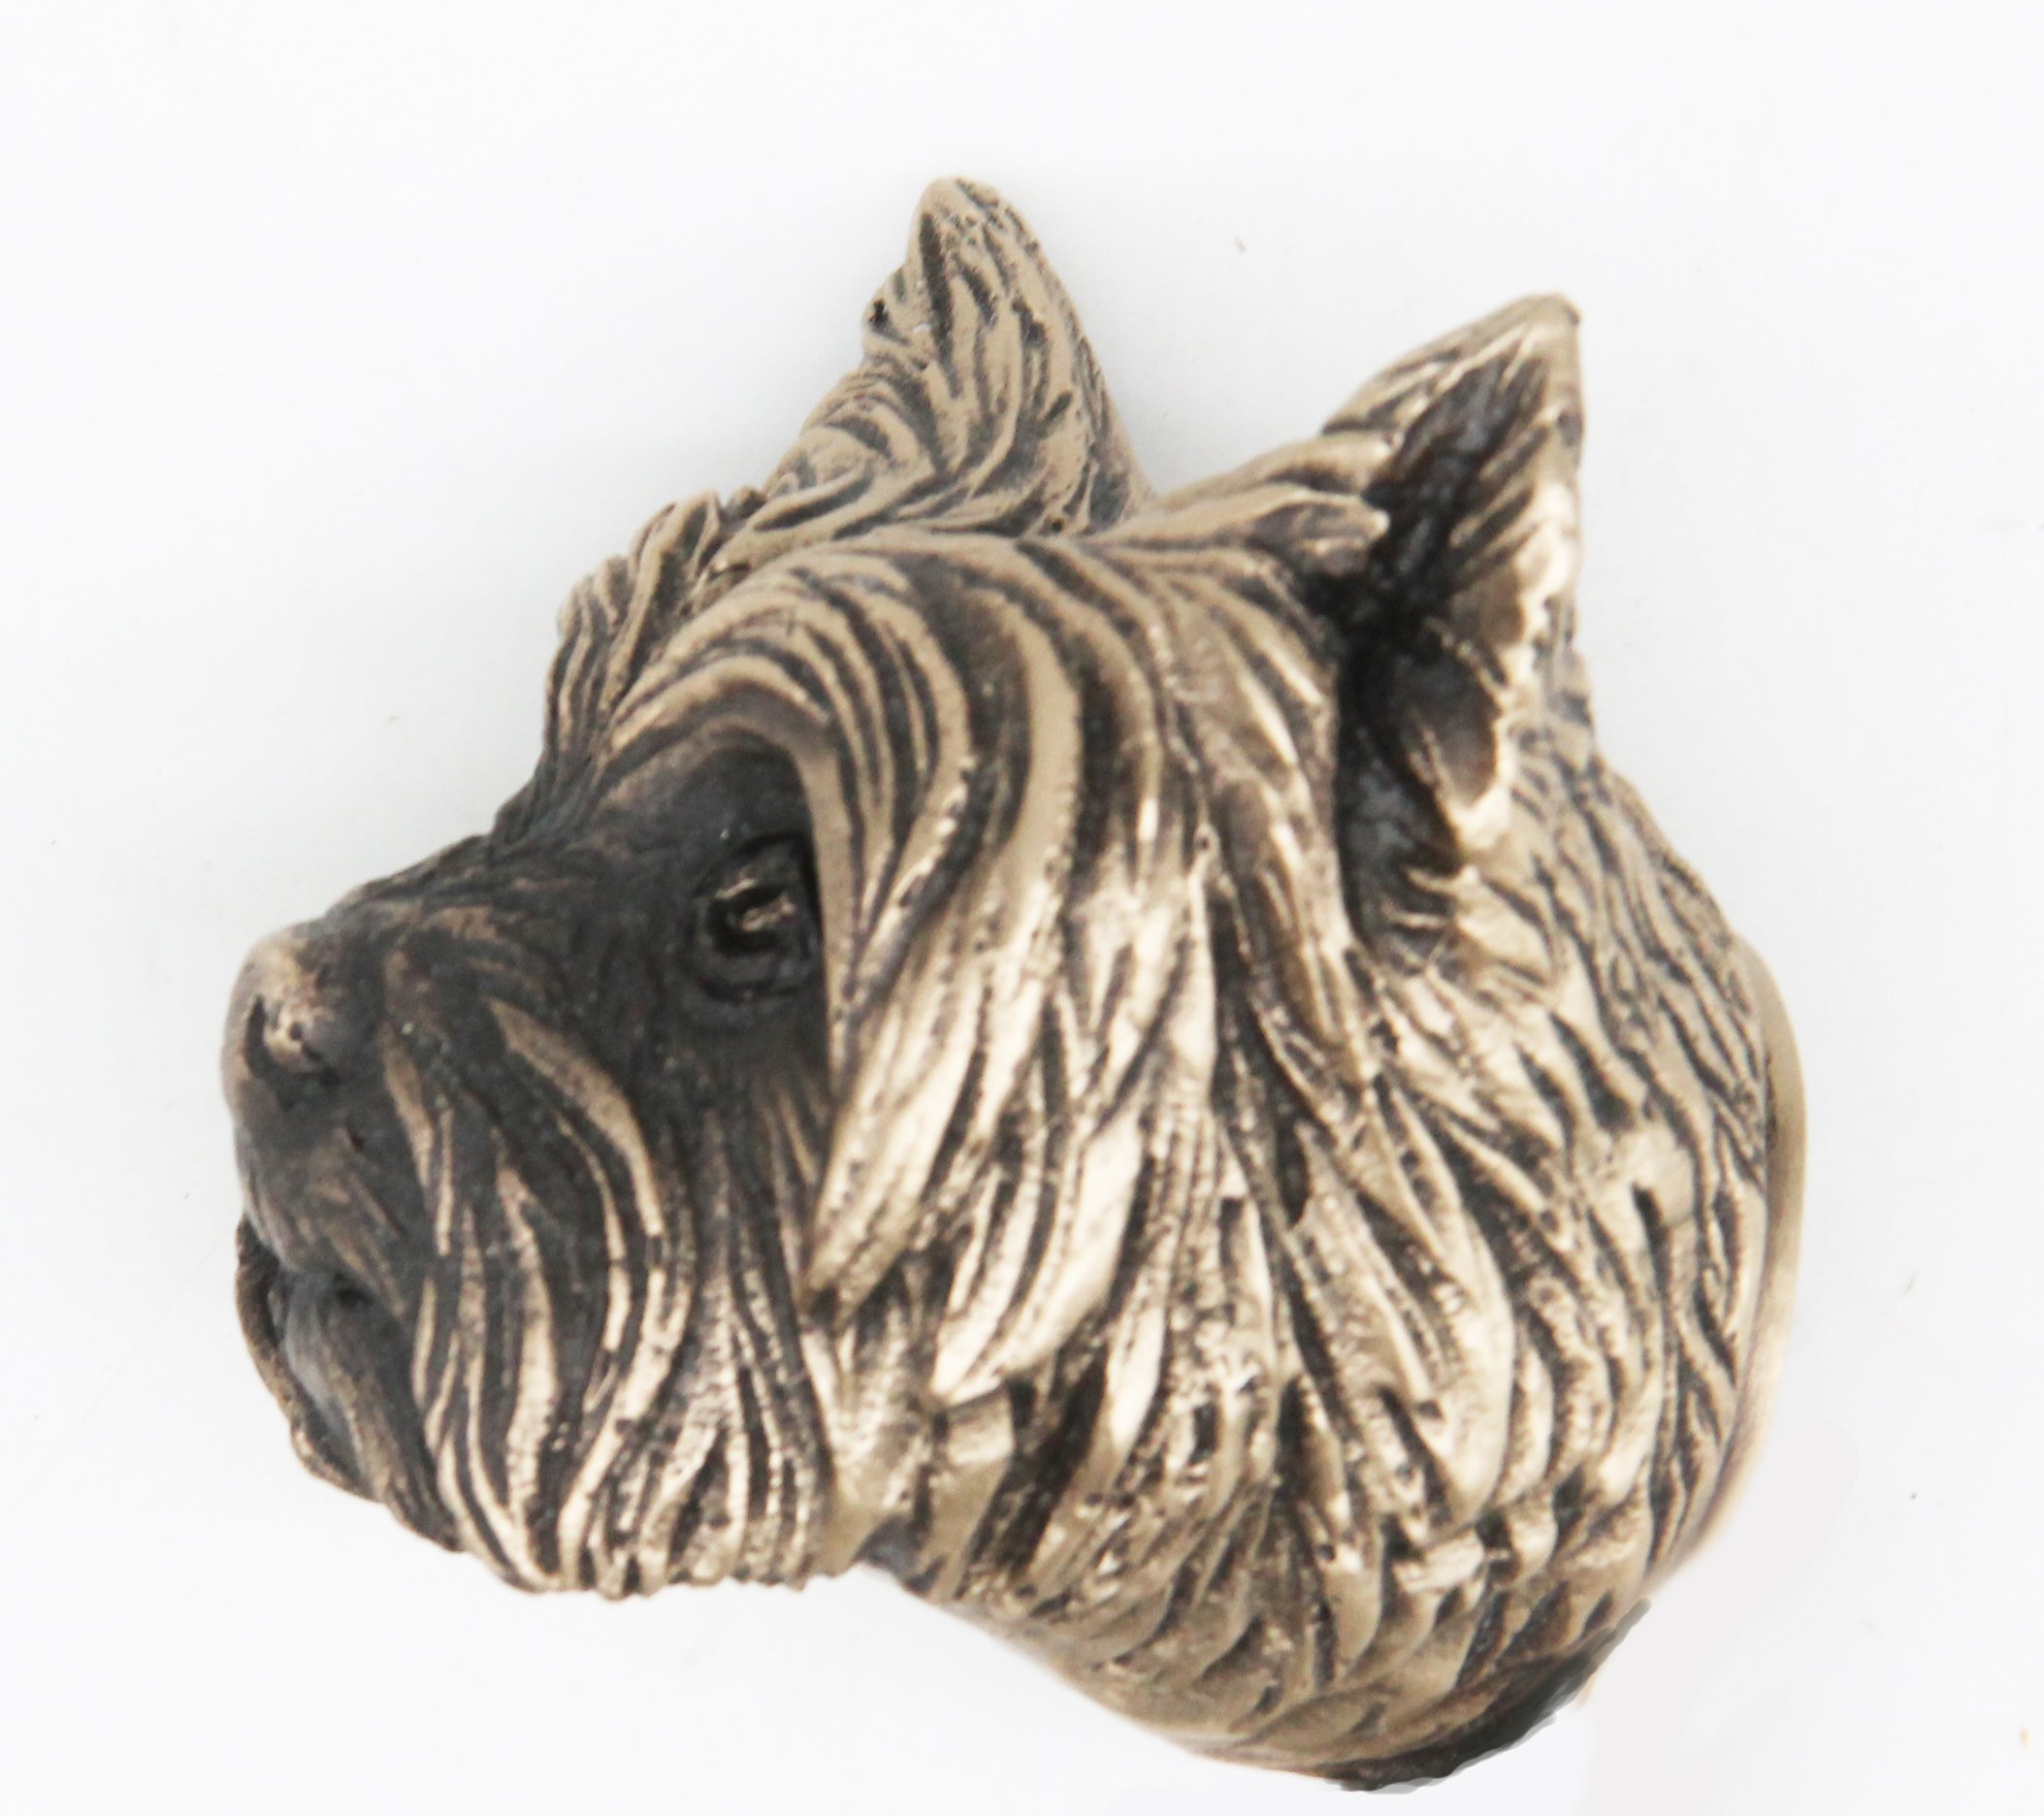
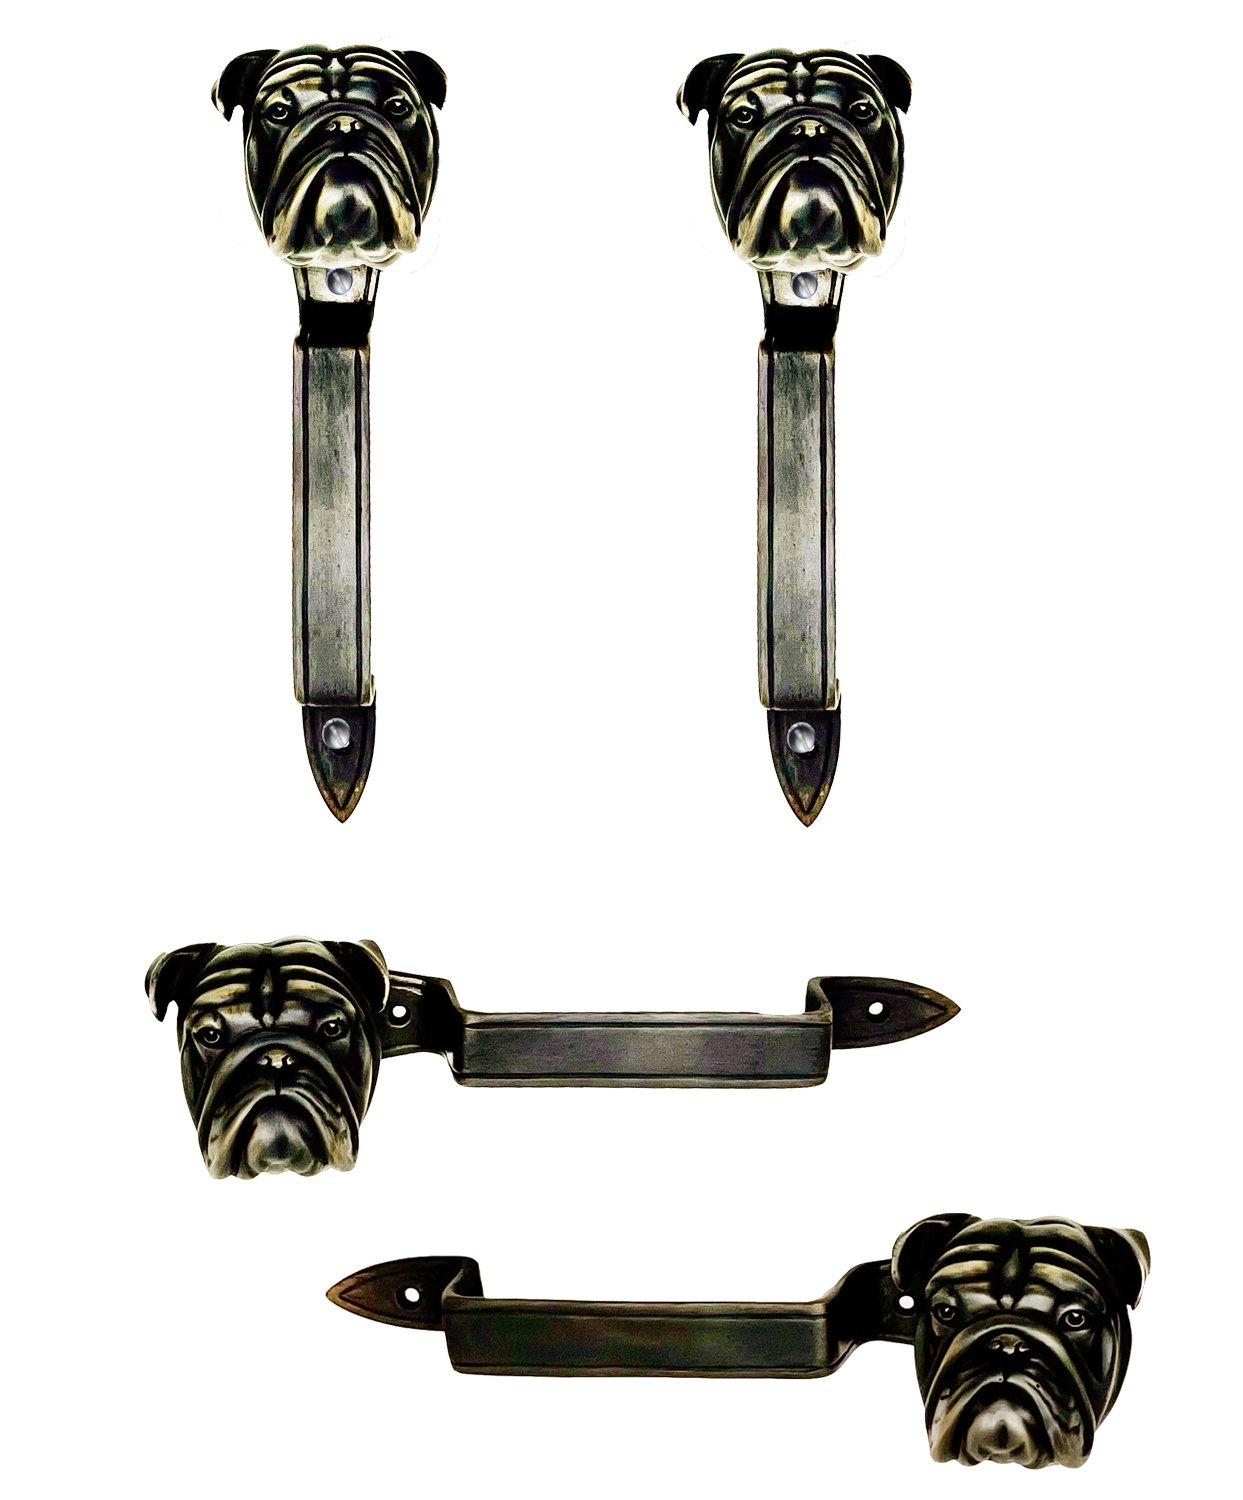
By studying many Yorkie photographs, Carlos, our patina expert, applies a dark patina solution of different intensity into the hair folds on the face and neck and highlights areas for contrast. While the patina does not replace the vibrant color of the Yorkies coat it does suggest the different color bands thereby adding realism.


In researching this breed, I happened upon a post “Famous Dogs in History” that documents the history of this small and very popular breed. While it is common knowledge that the breed was used to rid the Yorkshire coal mines and mills of rats they were also used as ratters in the trenches during WW1.

Yorkies today are the distant offspring of Huddersfield Ben, a show dog and productive stud who fathered many offspring until his demise in 1871. In the late 19th century when England’s coal mines and mills were driving the industrial revolution, the Yorkies popularity took off.

 The silky coat, playful disposition and compact 7lb weight help explain why they are so popular and while they are energetic their size makes them less demanding than our large 65 lb. Pit Bull.


Huntington Gardens - Shoya House

Our annual visit to the Huntington Gardens brought us to the new Shoya House Exhibit in the grounds adjacent to the Bonsai and Zen courts of the Japanese garden. It has taken only seven years to relocate this wood and clay house, section by section, using the same carpentry methods and hand tools as those used by the original craftsman. The house was built around 1700 and was both a family home and administrative center for the farming community.

Simple precise wood joints are held together by weight and through careful design without the need to add screws or nails. Our background as furniture makers gave us a deep appreciation of the hand planes, chisels and spoke shaves on display at the exhibit which are similar in function if not form to the old tools Martin brought with him from England.

 A comparison of the chisels used by the Japanese carpenter from those used in carving shows how that the Japanese tools had a straight acute end ideal for cutting a straight edge into wood used in making tightly fitted joints for beam and furniture construction. By comparison, most carving chisels have curved blades designed for removing and shaping wood. In both instances a mallet would have been used to hit the handle to help push the blade into the wood.

 A visit to the Japanese garden would not be complete without some shots of the amazing bonsai on display. The word “bonsai” is Japanese for “tree in a pot”. It describes trees that are grown and trained to appear as mature miniature replicas of tall older trees of the same species or as a collection of trees. The picture here shows bonsai “Goshin 111” designed by the well-known bonsaist, John Naka and it captures the shape of a small Juniper Forest with 11 trees.

To understand more I visited the site for the Golden State Bonsai Federation and learnt that Goshin 111 or” Spirit of the Guardian” is the third generation of this bonsai but one that closely follows the original design and represents John Naka’s children and grandchildren. In the 1990’s John Naka began training his 11 trees for Goshin 111 which was dedicated to the Huntington in 2001. Like all bonsai, the health of the soil and stability of the root system are key to its survival and must be constantly maintained and repaired. For this reason, only a prime selection of the collection is on display at one time with the balance being in various stages of restoration.

 Bamboo Corridor

There is no better way to approach the Japanese gardens than through the corridor of gently swaying bamboo shown below.

Our collection of plant cabinet pulls includes left and right facing sections of bamboo and a small bamboo stem.

The content of this post is based on information available at the Huntington Gardens site and the Golden Stare Bonsai Federation both well worth visiting.


UV Impact on Colored Patinas On Bronze


Arguably, from a door handle perspective, Florida can be one of the most demanding climates. The state is a peninsula surrounded by sea water and its latitude yields many days of sunshine and not surprisingly is home to many of our clients.

UV Impact on Bronze

When we hot patina a door or cabinet pull we heat the bronze with a torch and apply successive coats of pigment suspended in water to the metal surface which absorbs the pigment left after the water  evaporates. The patina absorbs UV and this leads to a chemical change that breakdowns the bonds between the pigment molecules making the color appear less vibrant. The lizard levers below will fade over time with UV exposure so what are the options?

Photo of lizards at patina stage before sealant applied. Photo courtesy of the photographer Maria Ramirez-Adams.

 How to lessen UV impact

Clear polyurethane resin and polyester offer 2 different ways of sealing and protecting the color.

Polyurethane acts as a UV blocker and as a resistant physical barrier that shields the color beneath. It blocks the UV by absorbing, deflecting and scattering the UV away from the metal surface thereby slowing chemical changes in the patina.

Clear polyurethane resin also creates a physical barrier that shields the layers beneath from UV and also from salt and environmental contaminants that can degrade the patina. The resin is typically sprayed onto the surface and air dried rather than baked.

 Polyester versus powder coat

Polyester is also an excellent sealant for protecting metal from UV and salt and environmental degradants. The practical difference lies in how they are applied and cured.  Polyester is applied as a powder using an electrostatic process. The piece to be coated is attached to a copper frame or rod which negativley charges it. The applicator, which is like a spray gun is positively charged and when fired the gun sprays powder onto the surface of the object. In simple terms think of physics 101 when a magnet is used to attract iron filings. The powder bonds to the surface of the object. To make the bond more permanent the coated object is baked  to a temperature of 350 to 400 degrees for at 10+ minutes. With polyurethane the finish cures over a longer period often taking 5 to 7 days to complete. The Geckos shown here were both hot patinaed with a green pigmented solution but the top gecko was first dipped in a cold dark solution and then both were coated with polyester and baked. Polyester makes the pieces a little plastic in appearance but it does offer a resilient seal that will last for years.

Discussion about learning art techniques

We are pleased to share a recent interview between Martin Pierce and Aaron Miller at Canvas Rebel.

Aaron structured the interview around 3 areas: learning and developing skills, pivotal moments in Martin’s career and unlearning habits or traits.

These questions allowed Martin to take a step back and look at his life in a more analytical way and helped prevent the interview from becoming cliched.  My role as ghost writer was to articulate this journey in a clear but expressive way. Our creative friend, Maria Ramirez Adams photographed Martin and several of his works at his studio and the framing of these shots gave the piece color and context.

The article can be read in full at Canvas Rebel’s site and the quotes below are intended as a primer.

Photograph Courtesy of Maria Ramirez Adams

Learning to unlearn

“As an apprentice wood carver, I learned to carve quickly and precisely, skills that made me a useful employee but also a prolific artist. I have had to learn to create with purpose and to understand that if my art is channeled into a business, I am not an untethered free spirit but must consider why one design versus another is worth making”

Learning skills

“The learning curve has been long … I was always interested in nature and enjoyed physical work but being dyslexic, I found studying a real pain. My school had 3 good courses, art, woodworking and metal work. I was drawn to woodworking and began carving at 12. I don’t think it makes sense to look back and over analyze wrong turns or wish you had done things differently.”

Current Focus

“Is the insect story I am creating in bronze and steel, and this is where I have a lot of fun. The plot line involves small insect loving humanoids who co-exist with large insects and together build houses and even compete in the annual insect race.”

Dung Beetle Types

The insect and humanoid collection of sculptures continues to evolve with new pieces in development. The additions are part of a narrative that will explain the relationship between the members of this fantasy realm and their lifestyles. The dung beetles’ ball building talent and the different uses the balls can be put to is the current focus. Not all dung beetles make dung balls or roll them and their different methods of building nests for eggs are a characteristic that separates and defines the different dung beetle species. Telecoprids shape dung into a ball and then roll it away from the dung source. Female telecoprids typically shape the dung into a big ball that is rolled to a brooding spot where she lays a single egg inside the ball. The brooding ball acts as a home and food source for the egg as it changes to a larvae and pupates to emerge as a young adult. Male telecoprids make smaller dung balls that they use as food for themselves and for their female mates but they also make larger balls to display their competence when seeking a female mate.

 Most of the dung beetles in our fantasy world are based on telecoprids but the paracoprid or dwelling dung beetles and the endocoprid or tunnelers and their social burrowing  ways have clearly impacted our telecoprids as they re-purpose their dung balls.

The concept drawing here is showing a humanoid on a swing with a young adult beetle inside a repurposed dung ball that has become the creche for young creatures. This will become a bronze sculpture soon and Martin has begun sculpting the ball pattern. The new piece will be smaller than the bronze ball that is available with a female telecoprid.


The telecoprid female rolls her brood dung ball, a feat that shows her engineering skills , navigational aptitude and formidable strength.


Innovating Door Hardware

The Morphic collection of door pulls lends itself to a variety of home designs partly because we cast in 2 mediums, bronze and stainless steel and partly because the fluid organic design pairs well with contemporary or traditional door styles and door mediums. So, whether your door is wood, steel or glass, minimalist or classical, Morphic can be integrated into the design statement.

End details

Unlike many of our collections, the series has 4 possible tips and we are planning a fourth which I am loosely calling desconstrucionist.
The  ends currently are standard heroic tip (left) and its larger relative (third from left), the symmetrical cylinder (second from left) and the scroll ends  (right). Each end is designed to contrast with the cell-like center and is easily accentuated by finishing in a different sheen or by powder coating with a contrasting color.

Planned Customization during wax creation.

The organic cellular design can be playfully adapted by cutting, splicing, and distorting the wax cell segments to create a unique piece. This is a new direction that we are experimenting with and has the potential to create one-of-a-kind pieces. For those who work in Photoshop this is similar to using the polygonal lasso tool to select an area on a piece and manipulating the shape using the transform function to create a warped edge. Using Photoshop to design  the new shape is relatively easy but replicating the piece first in wax and then in bronze or steel requires expertise in both casting and welding.

 Brazing

In a subsequent post we will discuss mixing the alloys of steel and bronze to create a hybrid pull.

Creative solutions for a narrow door stile

Whether an interior door or cabinet door, a narrow door stile can be a challenge. Creative positioning of a door pull can be a solution if you plan ahead. You will need to consider all the dimensions of your pull and not merely compare the width of a pull with the available width of  your door stile. The width, depth and height of many pulls differs throughout  a piece and this is especially so where the piece is not a symmetrical or a standard geometric shape.

The Hedgerow heroic trees are good examples of the variations within a piece.

Using Directional Pieces

The Hedgerow trees are a pair and the sway of the trunk is how we chose to designate one left and one right. Nature makes no such distinction which explains why these bronze trees can work pointing left or right as the restraints of the door stile dictate. The design and mounting spots  also allows the tree to be positioned a few degrees  off perpendicular which is helpful when positioning on a narrow stile.

The mock-up below shows a door with a 5” stile so by flipping the direction of the tree the sway of the trunks prevents knuckle collision. As the pull projects out by 1 1/2” it has ample clearance from the face of the door panel for a comfortable grip.

 Re-configuring the pull

Many of our pulls and handles are made in parts which are welded together. All of our dog door knobs are made with the head cast separately to the escutcheon or pull. For a narrow door stile, we recently re-configured the location of the head so that the pull could be positioned horizontally. In the mock-up below the door stile is a narrow 3” but the door rail at  41/2” allowed the dog head to be positioned upright.

Left: reconfigured dog head location Right: playful use of the standard dog head location

With a 3 1/4” distance between ears some planning ahead is needed for a narrow door stile

24" Center to Center Door Handles

Retrofitting handles to an existing door can be a challenge particularly when the doors are glass as it is not feasible to re-drill new holes in tempered glass or easy to  cover up the existing  holes. While this is true of any door, wood doors are less problematic as the existing holes can often be covered with a mounting bracket or the holes can be plugged when the door is stained or painted. Metal doors require some planning as welding a patch on site to cover holes requires access to someone skilled in using  a portable MIG welder.
In the last month I have received 4 enquiries from people looking, not for a specific style of door grip but for anything tasteful and readily available with a center-to-center distance of 24”. The enquires covered both exterior and interior doors made either from tempered ½” glass or 1 ¾” metal. They were all tall doors spanning 8’ to 10’ so the door handles needed not only to fit but be proportional and visually appealing appearance.
MOUNTING METHOD - Post
A door grip that is attached using mounting posts that project the handle outwards offers the easiest solution when working with existing holes as the posts can often be ordered at a custom center to center distance.
The Morphic cylindrical door grip can be ordered at 26”H, 32” and custom ordered for sizes up to 60”. As a rule of thumb, a 24” center looks balanced for handles up to 40”in length but a 30” and 40” center to center works better for 50” and 60” handles.


Flush Mounting
The Morphic serpentine pull and Ergo Epic and Mega are curvaceous handles that project out from the door face. These designs require the piece to be attached at the top and bottom flat sections by means of proprietary mounting brackets and through bolts which have some range of flexibility. While the Serpentine pull can be ordered at a 24” center the Ergo Epic and Mega are better suited for very tall doors with a 34” and 44” distance between centers.

34” and 44” distance between the centers of the mounting bracket

Katydid Sculpture Takes Shape

The Katydid, sometimes called a green bush cricket or long horned grasshopper is a family of insects with 8,000 species. In California we see both the greater and lesser angle-winged species which were  reference points for Martin Pierce’s latest addition to his insect collection of  sculptures. The actual shape of his new piece though owes more of it’s design to the Mediterranean species but even this variety was adapted for stylistic and practical reasons  and made with wider wings.

 For those interested in the name Katydid it comes from the Greek word “tettix” meaning small cicada. Wikipedia enlightened this writer to the onomatopoeic  use of “ tettix” which when repeated makes a sound similar to one made by the Katydid when rubbing it’s wings together. Interestingly, the word Katydid  is also onomatopoeic as when repeated  “kat-y-did “imitates the stridulation of this insect.

When complete the Katydid will be considerably larger than other members of this species at a substantial 11” high by 16”long.

The progress photos shown here are provided courtesy of Maria Ramirez-Adams a fine art photographer and film maker.

 Having decided on the shape of the katydid, Martin enlarged his sketch and drew it as a scaled profile on vellum. The profile was then redrawn on thicker paper but as 6 separate body parts.

The profiles were used as patterns and each body section was crudely cut from solid basswood. Once cut the sections were carved with a variety of wood cutting chisels.

The 2 wings were cut from 1/8” plywood and were soaked in water to make them supple so they be could be twisted and bent around the thorax. Once the correct shape was formed, the wings were clamped and glued at the narrow thorax end and will be used to create a complex 3 part mold. The 2 wings were carved as a unit with a protective brace to prevent their fragile form from breaking. The outer main leaf veins were first carved and then the smaller veins were drawn and carved.

Entry Garden Gate Designs

Entry Gate statement 

An entry gate does not have to be large to make a statement as the photo below shows. Equally, if the budget restricts, the locking mechanism can be simpler.

The gate featured here was custom made in solid walnut with walnut veneer recessed panels.

 The top panels to the left and right of the gate measured 12” x 18” x ¼” and were cast in solid bronze and decorated with a small frog from our animal collection of cabinet pulls. While frogs were used on these panels, many pieces from our cabinet hardware collection would work equally well.

 Gate Entry Hardware

The entry way handle set is from our collection of wine cellar door handles and the large vine grip was part of an entry thumb latch set. While a mortise thumb latch to lever lock was used here, a simpler tubular lock could be substituted.

This would need to be called out at the time the set is ordered as the tubular latch has only one port for the thumb latch and lever unlike a mortise with 2 ports that are spaced apart to create a more comfortable distance between the stem grip and thumb piece. To create a similar spacing for a tubular latch we would position the grip lower during machining. The thumb piece in this configuration would be off center and would be a custom design that is currently in development and will be available at no additional cost.

Off- center thumb piece being developed for tubular deadbolt configuration with lever on inside

 Gate construction

Walnut with exposure to sun becomes lighter and golden and like bronze develops it’s own living patina. The solid sections were roughly chiseled to give a more hewn rustic appearance. The structure and design of the wooden gate are not daunting and in the hands of a good gate maker or wood worker would be easy to recreate and not unduly expensive. Choosing the best sealant to finish the wood and maintaining it on annual basis is critical as exposure to rain, humidity and sun will cause the wood to shrink, crack and deteriorate over time.

Classic Entry Door Handles

Thumb latch handle sets are often used in  traditional styles of door hardware to make a  grand entry statement. The thumb piece on the front side of the door is usually one small decorative detail on a much larger back-plate. The Hedgerow, Grapevine and Willow collections all contain a thumb-latch entry set and we have designed to be an integral part of each set.

We also use the same mechanism on the Lizard entryway set where a less traditional butterfly is the thumb piece.

Understanding the function of the thumb piece

The thumb piece is used to activate the door latch that keeps the door closed. Our thumb latch sets have been designed for use with mortise locks which house the latch and deadbolt mechanism within a solid 6”H x 3”D x ½”W metal case installed inside the body of the door. The thumb piece has a seesaw motion so pressing down on the exposed thumb end pushes up the end that sits within the mortise box underneath the toggle area. When pushed up by the thumb piece the toggle plate pivots backwards which triggers a hammer plate backwards thereby releasing the latch and spring which kept the latch extended and the door closed. The hammer and spring, when released allow the latch to return into the body of the mortise thereby allowing the door to be pulled open.


Patinas For Hardware and Sculpture

In previous pieces we have covered  our standard light and dark antique patinas. For custom orders we also offer a hot patina, which is applied to pre-heated bronze. We limit these finishes to just a  few pieces, that include the  small butterfly pull, which can be special ordered in amber- yellow; the frog knob, which can be ordered in a blue green, and the lizard lever or knob which we can patina pea green.

Sandblasted brushed - patina ready Cold antique bronze patina Pea-green hot patina

With our new bronze sculptures, we are developing patinas made with ferric nitrate as well as liver- of sulphur. Ferric Nitrate is a chemical compound of iron powder, nitric acid and it produces a  rust red patina. Liver-of-sulphur  is a chemical compound of powdered sulphur, sodium, and water. They are applied to the sculpture with a spray bottle or brush and the sculpture is preheated to a temperature of approximately 100°to 200°depending on the chemical and dilution. As the sculpture is hot, the wet patina attaches to the surface and the moisture evaporates quickly leaving behind a layer of color.

The colors these patinas produce on bronze can vary from gold to brown to red to dark red to black, depending on how hot the piece is, and how many coats are applied. The chemicals below can be mixed and diluted to produce a wide range of hues. They can also be applied over each other provided the previous patina has sufficiently dried. By layering the patinas and by using brushes and different spraying methods it is possible to develop deep mottled colors and effects. It has taken a lot of practice and years of trial and error to create the look we are seeking for each sculpture.

1. Scotch bright surface 2. Sulphur dioxide spray mist onto surface 3. Diluted bismuth white splatter spot spray

4. Ferric nitrate fine spray cover surface fine coating. 5. When dry wax

Words of caution to anyone thinking of learning how to patina bronze, exercise caution and a generous helping of common sense. The patinas we use are applied in a very well ventilated area and masks and gloves and protective aprons are a must. We also exercise considerable caution when heating up bronze as temperatures above 100° can burn exposed skin.

Liver of sulfur – yellow brown to black tones

Ferric nitrate – red tones

Ferric chloride – darker red tones 

Bismuth nitrate and titanium dioxide – white

Cupric chloride  – pea green or apple green

Cupric nitrate – blue green

A very good site for reading more about patinas and for practical advise on formulas can be found at David B. Bowman an artist in the San Francisco Bay Area.

A Guide to Welding Sculpture

The skill set developed in  creating bronze and steel door handles has proven an invaluable foundation for Martin Pierce’s art work. However, until we recently met Maria Ramirez-Adams we were unable to document the welding and patina techniques used in both hardware and art. Maria’s skill in capturing these moments will be the focus of this and other posts.
For those unfamiliar with the different types of welding www.thecrucible.org provides some very accessible well written pieces as well as instructional courses.
To assemble the components parts of a door handle we use the TIG welding method which does have a slow learning curve but is well suited to welding different thicknesses of metal and to welding very small pieces that need just enough weld to form a tight small bond. TIG welding can be used to weld either our 316 marine grade stainless steel or our silicon bronze castings. The abbreviation TIG stands for Tungsten inert gas also known as tungsten gas arc welding. TIG welding works by heating up the areas of metal to be connected and by inserting a welding rod of the same metal in this area to create a pool of melted metal that will form a connection or weld. The welding torch has a tungsten electrode that, on contact with metal, sparks to form an arc. While the electrode receives a constant current of power the voltage is controlled by a foot pedal which when depressed shortens and intensifies the heat of the electric arc.

Argon gas plays an interesting role, it’s purpose being to protect the welding process from contamination. The gas passes through the welding torch and shrouds the arc of the torch thereby preventing the weld area from being degraded by oxygen and other elements that could impact the integrity and strength of the weld. Argon gas is inert or inactive so it does not combine with elements in the air or work area so works perfectly as a shield.

To see Martin in action welding visit this informative video by Maria Ramirez-Adams.


The Hornet on Apple is a limited edition of 30 and is part of a collection of larger-than-life insects and diminished scale humans. The piece weighs 32lbs, measures 13"W x 10"D x 13"H and is a welding challenge. To attach the human to the apple the surface of the apple is heated first and then the welding torch is brought closer and closer to the human and apple and a small area of the foot and apple are melded or tacked together to form a temporary connection. The welding rod is then melted to fill in the remaining gap between the foot and apple.

In door hardware the non-operative door trim typically the requires fine TIG welding. For example, the operative Hedgerow passageway set has moving non-fixed parts and is assembled with through bolts and a spindle that activates the door latch. By comparison,  non-operative version is fixed in place and the lever is welded to the backplate using the fine TIG technique.


Left: Showing weld before clean-up Center: Buffed Right: Operative Form

A complimentary accessory to the dung beetle

After casting and patinating the first bronze dung beetle, we felt it was missing its ball or dung larder for the food needed by the eggs that are laid inside which will grow into hungry grubs.

Dung beetle from the collection of fantasy sculptures

The adult beetle locates dung by smell and he collects and works the dung to create a ball which is rolled to collect layer upon layer of dung. However, the location of the completed dung ball is not always ideal and the ball may need to be moved to a better pre-established nesting area.

In order to move the dung ball, the beetle rolls it backwards by holding it with its rear legs and pushing  with its front legs. Doing it this way has its setbacks, as it cannot see obstacles in its path or see if he is pushing in the right direction.

As the pathway cannot easily be seen he climbs on top of the dung ball and turns in a circle to get his bearings. To navigate the correct direction, he uses the  position of the sun during the day and position of the stars at night as a compass. These are remarkable insects and are not complete without their ball.

The dung ball we have created is a perforated organic bronze shell, we used our artistic license to create something a little more attractive than the typical dung ball.

The ball is approximately 7 inches in diameter and cast in 3 sections that welded together in the bronze.

The overall sculpture with dung beetle  is 12 inches high.


The beetle navigator’s head and thorax were patinaed a blue green and the wing casing was patinaed dark grey black.

 For more functional creatures please look at our animal cabinet pulls and our netsuke collection of dragon, bee and frog door knobs.

Mexico City - Magical Destination

Mexico City is like that rare book or film that exceeds all of your expectations. We have visited Paris, Barcelona, Copenhagen, London but none was as vibrant and colorful as the sights  and people we found in Mexico city.

We began our first day exploring parts of Condessa and Roma Norte before catching the metro to Jamaica market. This was the day we travelled with the aid of Panda, our highly informative and very funny local guide to enjoy street food in her “Eat like a local” day tour. I am not a fan of the metro having taken both the underground in London and metro in Los Angeles but found the cleanliness and safety of this Mexican metro a pleasant discovery. We arrived at Jamaica market, a must stop for sampling delicious green chorizo tacos and huitlacoche, a corn that has a fungus that imparts a unique flavor. For liquid refreshment we sampled tepache, a fermented drink made form pineapple, sweetened with agave with a hint of tamarind and cinnamon. Flowers of all types are  also a feature of this market  and arrive fresh each day to be pruned and prepped for customers.

On our second tour we drove with Gabriel of Karma Trails  south to Xochimilco  or floating gardens an area of canals and colorful boats or trajineras and also a flower growing area that supplies markets including Jamaica market. The canals link the small man-made islands that evolved over time to supplement the farming terraces in the surrounding hills.


Next, we visited Coyoacan which is south of Condessa and north of Xochimilco and where the first organized settlement was established. The hacienda and casa configurations became the template for many of the Spanish towns that took root as the Spanish moved north and south of the city. Cobbled streets connect the residences to the commercial center and the town square fittingly has 2 bronze coyotes, namesakes of the towns translated  name “Place of coyotes”.

 Frida Kahlo lived and worked in Coyoacan and much of her work is on display at the Frida Kahlo Museum inside the blue house that was her residence.

Much of the history of Mexico City is on permanent display in its architecture and gardens but to understand pre-colonial times visit the National Museum of Anthropology located in Bosque de Chapultepec a park on par with New York’s Central Park. The museum chronicles the history of the indigenous people from the Mayan era to Spanish Colonialism with wonderful displays depicting  their differing  social lives, religious beliefs, and commerce.

Xochipilli - Aztec God Of Art, Games and Flowers on Display at the National Museum of Anthropology

 The street art of Mexico City is every where and from our Sofitel Hotel room we had a daily viewing of “Generation Equality” by Adry del Rocio a Mexcian artist of world repute.

On this trip we took a break from searching out door handles but could not help but notice the creative and detailed iron work on display in the historic district so hopefully we can devote more time to these crafts in our next trip.


Beauty is in the eye of the beholder

When developing our line of Dog Knobs, one of the breeds we chose was the Staffordshire Bull Terrier, although not the most popular of breeds, we had one lovely example named Iris who we dearly loved. Iris has since past and now we have another Staffy called Jackson who is a very young, very strong and a very vocal young male. When we were contemplating a second Pit Bull, we spent time meeting rescue dogs to see if Iris would share her home with one and Jackson was her choice. Had we not spent the time checking both dogs for compatibility we may well have repeated a mistake made years before when we foolishly asked our resident Vizsla to share her home with a second Vizsla. While that particular canine bond was always a sensitive one, Jackson and iris got on fabulously and indeed Iris’s longevity and mental acuity we ascribe to Jackson’s puppy playfulness.

While Iris’s markings and ears  were very different to multi-colored perky eared Jackson, they both share the same head shape and extremely powerful jaw with soft and gentle muzzle and disposition.

 We understand that every dog owner loves their particular companion’s characteristics so for those of you with poodles, boxers, French bull dogs Golden retrievers, Labradors or German Shepherds, rest assured we have leash hooks and door knockers available for these breeds.

Oil Rubbed Bronze

We are revisiting ways we show our collection of Willow entry door knobs and interior handle sets. The trend is moving from old darker traditional finishes to lighter oil rubbed finishes.

The Willow collection, while inspired by swirling willow leaves and tendrils, still reflected the classical lines of older European architecture that Martin and I knew in England. Indeed, Martin’s training as a wood carver required him to carve more formal flowers and  leaves as relief carvings and this education served him well when carving the very detailed facets of the Willow collection.

 By moving away from dark oiled bronze to a lighter patina the detail of the piece is now able to shine through. We hope you will like this new direction but should you still be looking for a more Baroque or Victorian finish we are continuing to offer this collection in darker tones.

The photos here show  the before and after appearance of the passageway, privacy and entry knobs and lever sets.

To create the light and dark patinas we follow the same process of finely buffing away  imperfections visible on the surface of bronze and then immersing the piece into a premixed oxide. The oxide creates a fine dark film as it adheres to the surface but it is immersed twice to create an even and strong bond. The oxidized bronze is then re-buffed or sanded thereby removing the dark patina to expose the bright champagne tone of the silicon bronze.  The difference between these 2 finishes reflects how much and what areas of the oxidized film are removed by buffing.

The degree to which the surface is sanded and polished also impacts the level of contrast this is done prior to the casting being oxidized. In the darker piece the willow leaves were polished to a higher luster than the back plate which was left as a satin finish and which when oxidized creates a greater contrast. By comparison the lighter piece was more evenly polished to a satin finish and the effect is a more universal tone.